No Mac? No Problem
How To Install OpenClaw
24/7 OpenClaw Automation: Zero Downtime Setup Guide.
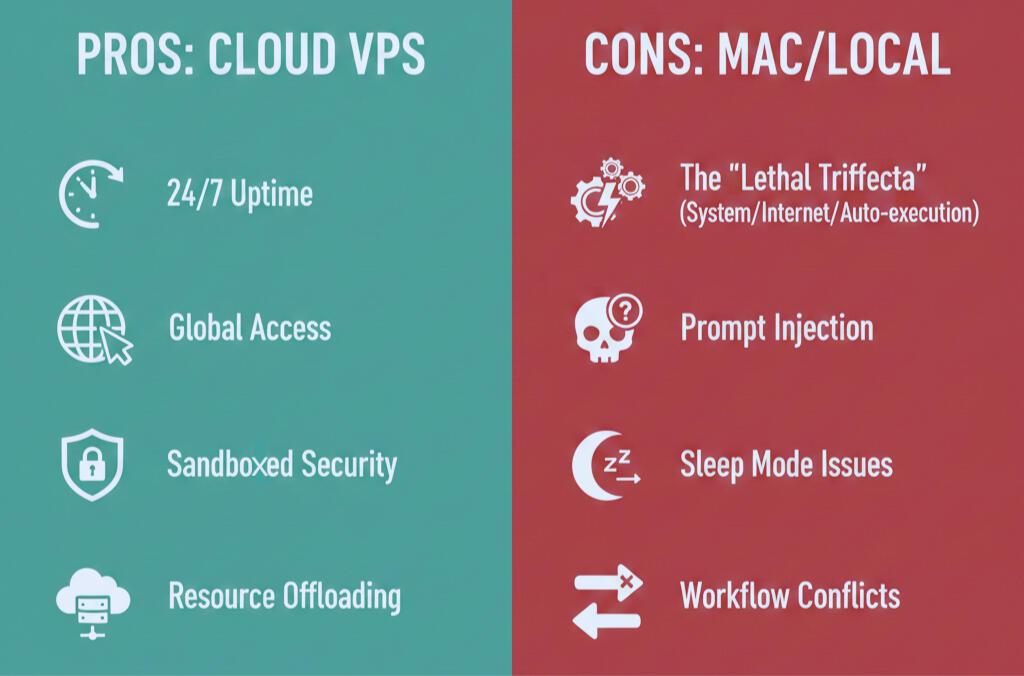
VPS VS MAC
Installing OpenClaw on a VPS provides many benefits compared to installing on your Mac or another local machine
What is a VPS?
VPS hosting is a service that uses virtualization technology to provide users with a virtual server with dedicated resources and an independent operating system.For beginners- Think of it as a private slice of a powerful computer that runs its own system, giving you your own dedicated virtual system and memory that you can access from anywhere.
Why use a VPS for OpenClaw?
High Uptime & Reliability: Unlike a local Mac, a VPS (DigitalOcean, AWS, etc.) is designed to stay online 24/7. This ensures your agent is always available to handle inbound leads for your business or update sports data for your "Schedgeule" app without interruption.Accessible From Anywhere: Since a VPS has a public IP (or can be easily tunneled), you can interact with your agent via WhatsApp, Discord, or Telegram from any device globally without keeping your home computer awake.Sandboxed Blast Radius: If the agent makes a mistake—like running an accidental rm -rf command or getting caught in a loop—the damage is limited to the isolated VPS. It won't brick your development environment or wipe your Xcode projects.Offloaded Processing: Running an agentic system involves background browser instances and tool-calling that can be resource-heavy. A VPS keeps this heat, fan noise, and battery drain off your primary machine.Ease of Deployment: Many providers offer 1-click Docker templates for OpenClaw, ensuring all dependencies (Node.js, Python, Chrome) are correctly configured in a standard Linux environment.
Setup
What You'll Need Before Starting
Before you begin, make sure you have:
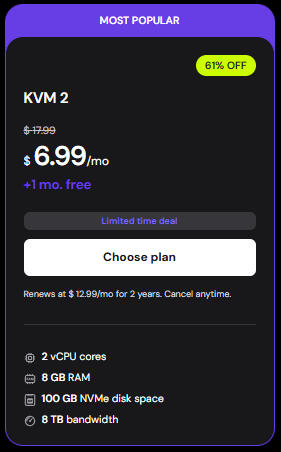
-A VPS (Virtual Private Server), I recommend: Hostinger VPS
-The KVM 2 plan is perfect for OpenClaw. For a limited time only save 20% on a plan by using the link above
-Choose Operating System: Ubuntu 24.04 LTS (select this when setting up your VPS)
-Your server's IP address (you'll get this from Hostinger after creating your VPS)
-A terminal application (Terminal on Mac, PowerShell or Command Prompt on Windows)
-Note: Anywhere you see YOURSERVERIP, replace it with your actual server IP address (example: 143.198.45.123).
Setting Up Your VPS
Connect to Your Server
This step gets you into your server so you can start setting things up.
What you're doing: Logging into your server remotely using SSH (Secure Shell).
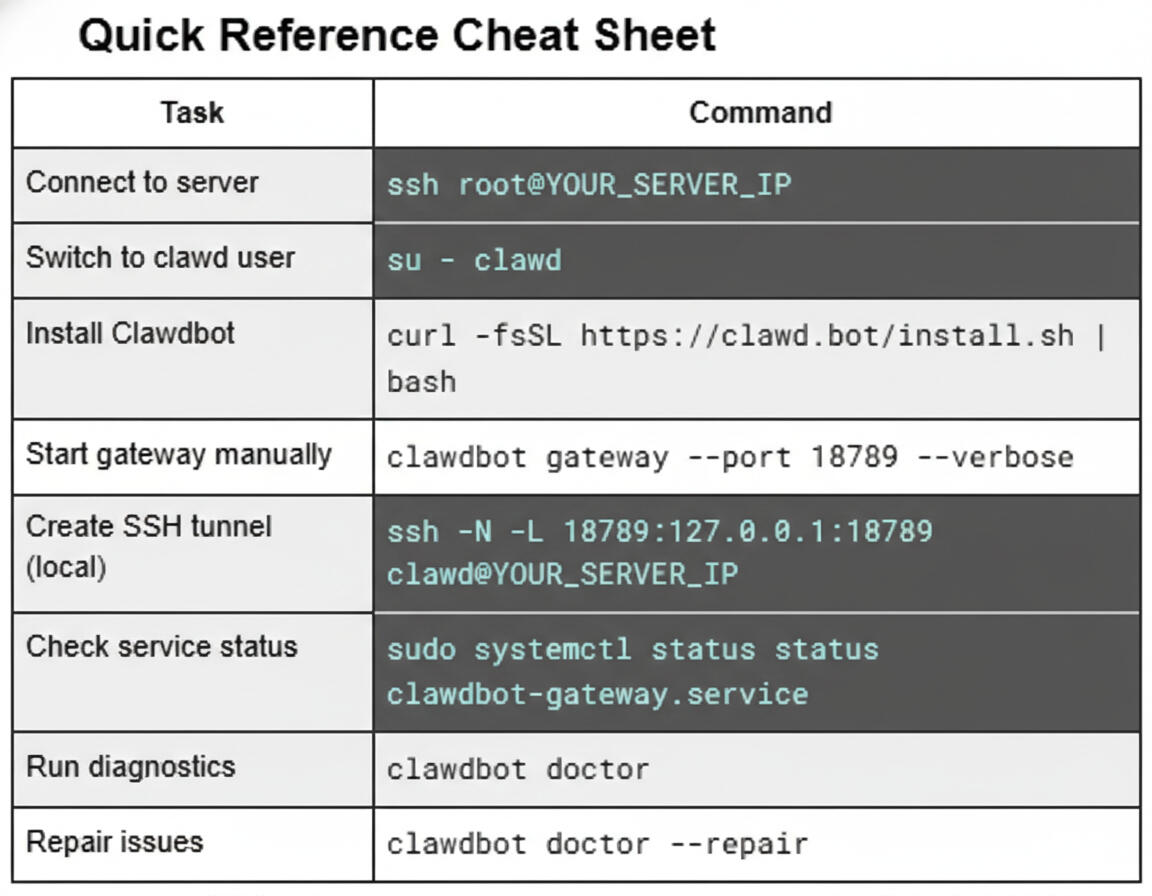
On your own computer run: ssh root@YOURSERVERIP
After running this command, you'll be asked for your server's root password. Type it in (you won't see the characters as you type, that's normal) and press Enter.Create a New User
For security reasons, we don't want to run everything as the "root" user. We'll create a dedicated user called "clawd."
Step 1: Create the user
adduser clawd
You'll be asked to create a password and fill in some optional info (you can press Enter to skip the optional fields).
Step 2: Give the user admin permissions
usermod -aG sudo clawd
Step 3: Switch to the new user
su - clawd
You're now operating as the "clawd" user instead of root.
Installing OpenClaw On Your VPS
Now we'll install OpenClaw on your server.
On your server run the install script:
curl -fsSL https://openclaw.ai/install.sh | bash
This downloads and runs the official OpenClaw installer. Follow any on-screen prompts to complete the onboarding process.V. Start the OpenClaw Gateway
The gateway is what allows OpenClaw to communicate. Here are a few ways to start it:
Option A: Start with sudo (if needed for permissions)
sudo -u clawd openclaw gateway --bind loopback --port 18789 --verbose
Option B: Start without sudo
First, check who you're logged in as:
whoami
If it says "clawd," you can run:
openclaw gateway --port 18789 --verboseVI. Connect from Your Local Computer
To access OpenClaw from your own computer, you need to create a secure tunnel.
Open a NEW terminal window on your local computer (not on the server) and run:
ssh -N -L 18789:127.0.0.1:18789 clawd@YOURSERVERIP
This creates a tunnel so your computer can talk to OpenClaw on the server. Keep this terminal window open while you're using OpenClaw.
Troubleshooting
If something goes wrong, these commands can help fix it.
Quick Tip: Every server setup is a little different. Your experience may vary based on whether your ports are open, what operating system you're using, or if you've done similar setups before. If you get stuck and this guide isn't solving your problem, try using Perplexity to research the specific error or issue you're running into. It's a great tool for understanding what commands you need and why.
Run the doctor tool to diagnose issues:
openclaw doctor
Automatically repair detected issues:
openclaw doctor --repair
Restart the gateway service (if you set it up):
sudo systemctl restart openclaw-gateway.service
View live logs to see what's happening:
sudo journalctl -u openclaw-gateway.service -f
Stop the gateway service:
sudo systemctl stop openclaw-gateway.serviceOfficial OpenClaw links:
https://docs.openclaw.ai/start/getting-started
https://docs.openclaw.ai/help/troubleshooting
FAQ
1. "Why can't I just run this on my PC/Mac?"
The Answer: You can, but you shouldn't for 24/7 tasks. OpenClaw needs to stay active to handle incoming requests from Telegram/WhatsApp. If your laptop lid closes, the agent dies. Using a VPS ensures your personal AI is "always-on" without burning through your local battery or hardware life.2. "Is OpenClaw/Moltbot secure on a server?"
The Answer: Running autonomous agents always carries risk. This is exactly why we use a dedicated VPS. By isolating the bot on its own instance, you ensure it has no access to your personal files, browser cookies, or local network. It’s the "Sandbox" approach to AI safety.3. "What are the minimum specs I need?"
The Answer: OpenClaw is surprisingly lightweight since the LLM processing happens via API. However, for smooth Docker performance and log management, I recommend at least 2GB RAM and 1 vCPU. The specific plan I linked above [Your Link] is the exact configuration I used for this tutorial.4. "ClawdBot vs. Moltbot vs. OpenClaw: What's the difference?"
The Answer: They are the same project! The name changed due to trademark reasons. This guide uses the latest OpenClaw build, ensuring you have the most stable, bug-fixed version of the software.